Well, I'm afraid I haven't posted here in about 3 months. In that time I have:
- Interviewed for a job
- Got the job (teaching full time - yay!)
- Discovered I was pregnant with baby #2
- Worked until I couldn't sleep at above job
- Enrolled my son in daycare
- Un-enrolled my son from daycare to stay home with papa
- Missed my boys terribly
What I have NOT done:
- any making of any kind.
Actually, that's not true. We're trying to make most of our Christmas presents for family this year, so I have made a huge batch of mustard, some of my brother's infused salts, various chocolate barks, and an absolutely delicious batch of almond roca. Hopefully more to come today. And seeing as today is the first day of Christmas holidays for me, I wanted to jump back into it!!
Here's what I made today:
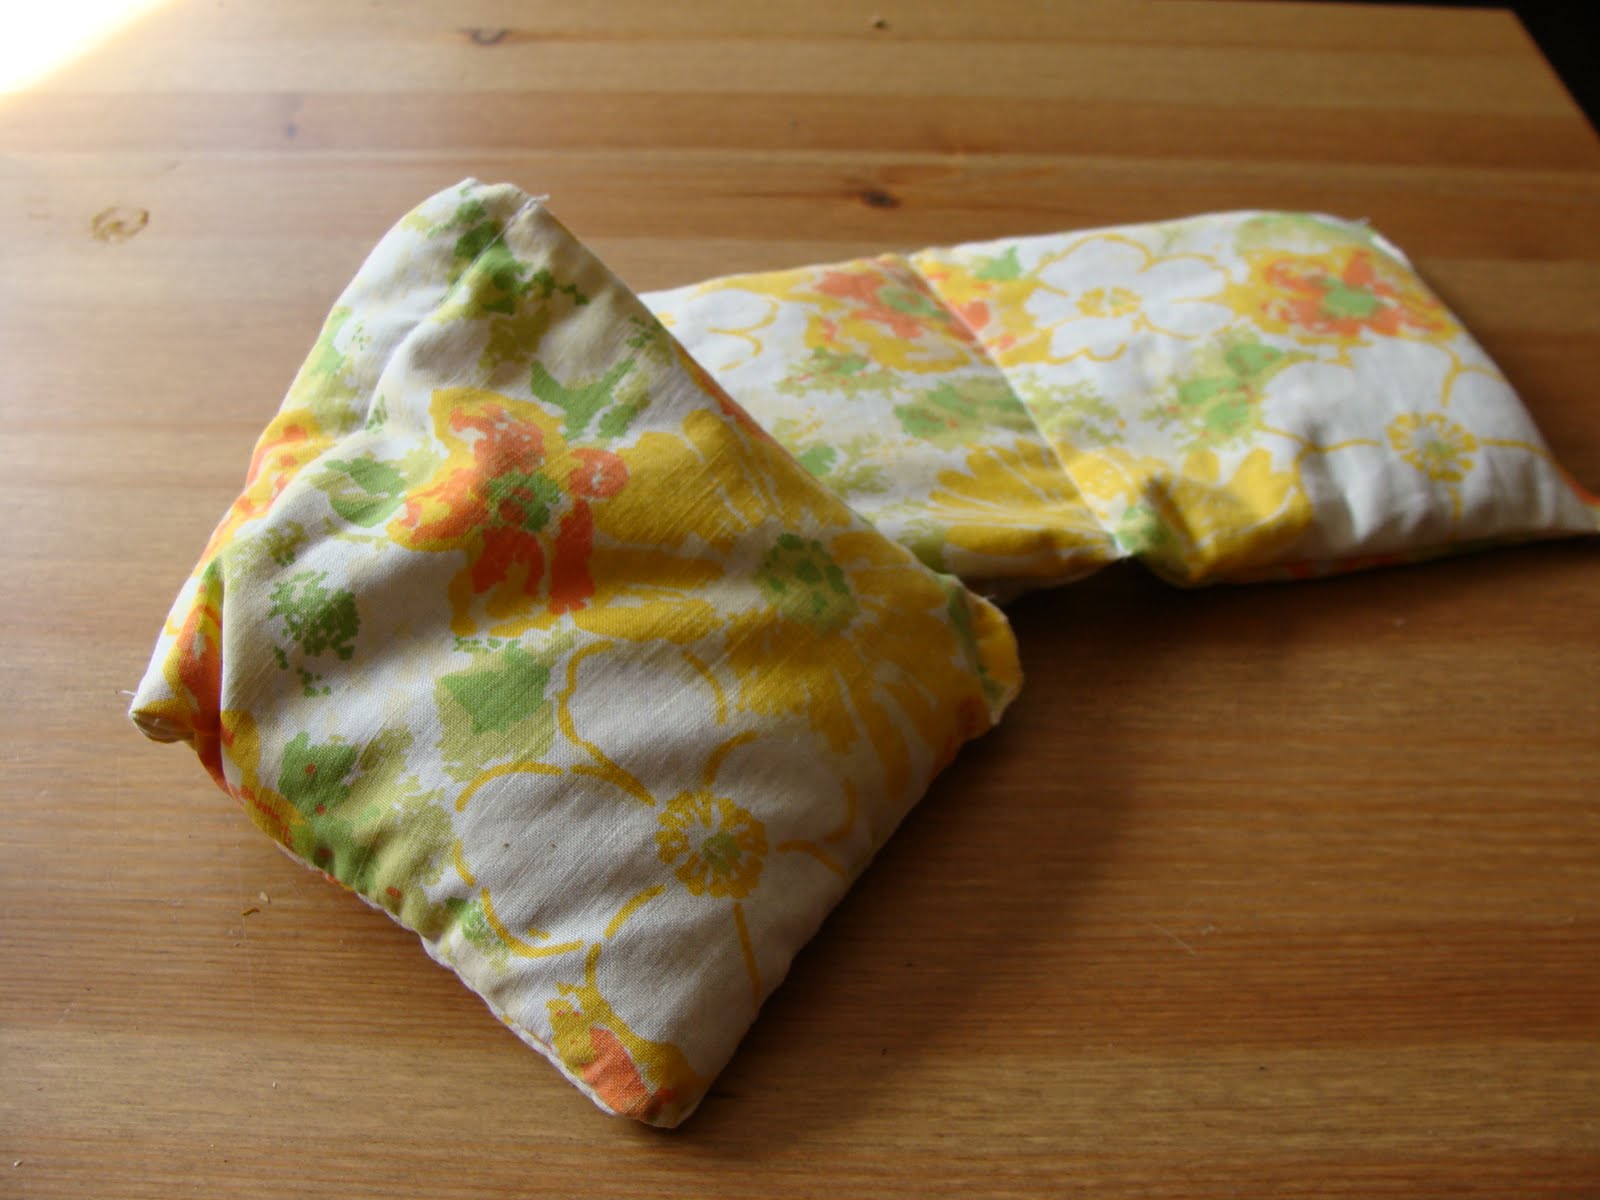
Nursing pads!!
Cost: $0
(just cut up a receiving blanket I barely used with baby #1. This kid was so big, none of the commercial ones were any good to me, since he wasn't a spitter and I couldn't swaddle him in these. Had to get my mom to make special big ones!)
What I did:
1) Fold blanket in half. Trace out 8 circles ( really 16 because of the fold) using a 4-5 inch bowl as a guide. Cut out.
2) Fold in half and sew a little dart in each one (from the center to one edge, about 15 mm at the widest point of the dart). Cut off excess material from dart.
3) Layer 4 circles together, wrong sides facing in, and serge around the outside.
4) That's it!
This project seriously took me half an hour to complete and now I have 2 sets of nursing pads that I made from something I wouldn't have used anyway!! I still have lots of fabric left in that first receiving blanket, so I'll probably make more, but I figured I should ease myself back into the whole crafting/making thing. Wouldn't want to overdo it... And besides, there are episodes of Glee to be caught up on ;)
Saturday, December 17, 2011
Wednesday, August 24, 2011
Made It: Ketchup
I picked up 30 lbs of tomatoes the other day at a farm market, intending to can most of them, but I've been wanting to make some of my own ketchup for a while. Since I had the bounty, and it seemed like more fun than simply canning these beauties, I decided to go for it.
 |
| I took the photo with the wrap still on the tomatoes... that's why they look like that. |
The recipe only calls for 2 lbs of fresh tomatoes, which didn't really seem like that much... but there's a whole lot of other stuff in there! Mostly onions, fennel, and celery. And spices. I used the recipe from Jamie Oliver's Jamie At Home book. Cook the veggies down for a while...

Then add the tomatoes, fresh and canned (all fresh if you want to use different coloured tomatoes)

Cook it.

Then you whiz it up, put it through a strainer a couple times, add things like vinegar and brown sugar, cook it down to the right consistency, and bottle it in sterilized bottles. Since I was canning stuff at the same time, I ended up canning the 2 small jars. However, we've been using any excuse to eat this ketchup lately, and half the big bottle is already gone! This ketchup is so wonderful - it's like a taste explosion! I probably should have added a touch more vinegar, but it is still pretty amazing.

Monday, August 15, 2011
My brother could probably make that...

I visited my brother at his house for the first time in years a few weeks ago, and found something amazing - herb-infused salts! That he made himself! This is not surprising, if you know my brother. I recall a time when he was probably 16 or 17. I was in the kitchen with him while he was cooking something. Grinding herbs in the mortar & pestle. He comes over to me at the table and says, "Smell this. Do you think it needs more tarragon?" I still don't know what tarragon smells like! Anyway, this guy loves to cook in interesting ways.

These salts are awesome because:
1) they're made with beautiful coarse sea salt
2) they're all in these lovely understated mason jars
3) they are SO easy
4) I wish I had thought of this

I'm pretty sure he just mixed up some salt with some fresh herbs. One is rosemary and garlic (whole cloves), another is a poultry blend, and I'm not sure what the orange one is.

If we had stayed longer, I would have loved to use some of this gorgeous salt in some way! Even if it was just to spice up some eggs... Yum!
Thursday, August 11, 2011
Made It: Baby Bow Tie

Here's a super easy way to zazz up your little (or big) fella's next fancy outfit. Make a bow tie! Since most of Charlie's outfit was pretty plain (white & black) I figured we could go bold with the bow tie. Because that's what it's for, after all!
I used this tutorial, which you should check out because she has beautiful photos as well as very easy to understand instructions!
First things first: cut out your fabric. I sewed each piece into a tube, turned inside out, and pressed.

Then, with the big bow piece, fold each edge into the middle to meet. Sew in place using a zigzag stitch up the middle. (See, this is why you need to see the real tutorial. Better instructions)
Sew an inch long straight stitch perpendicular to the zigzag.

Attach the velcro to the neck part. When you do this, you can fold the unfinished end kind of like an envelope, pin the velcro on, and just sew around it normally. (Honestly, it's like I'm not even trying here...)

Finally, place the bow part over the center of the neck part. Pinch and arrange the bow part until you think it looks right. Fold the middle piece over the bow and neck parts, keeping the ends toward the back. Fold under and tighten to your desired look. Hand stitch that sucker together and you have a bow tie! Amazing!

I cut out my fabric the night before, but getting up at our regular 8:00, I was able to finish this bad boy by 9:15.

Here's Charlie, monkeying around in a bow tie at a wedding. I'm thinking I might have to find some more nice fabric and make him a little collection.


Wednesday, June 15, 2011
Made It: Lampshade Baby Mobile
A while back I took out this book from the library. Anna Maria's beautiful fabrics caught my eye, as well as the sweet baby patterns. I made the little booties for a baby niece, and wanted for so long to try the mobile.
A friend of mine will be having a baby imminently, and this friend is one I forever admire for her funky sense of style and art. She is so thoughtful about her art, both in the selfless-giving sense of the word and also contemplative. And she is careful to put herself and her personality into everything that surrounds her. Picky about what she likes. I like that.

Anyway, as soon as I heard she was having a baby and doing up an awesome nursery, I knew she was the one to have the lampshade mobile.

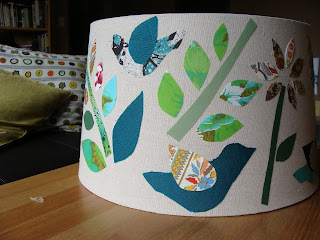

These pictures are obviously not of the shade as a mobile, and I didn't get a photo of the little birds hanging down. But rest assured, they're there, and they're the cutest part of the whole thing! Maybe once it arrives, my friend will be able to take a picture for us to share. That is, if she has time for pictures with a brand new baby to take care of...
A friend of mine will be having a baby imminently, and this friend is one I forever admire for her funky sense of style and art. She is so thoughtful about her art, both in the selfless-giving sense of the word and also contemplative. And she is careful to put herself and her personality into everything that surrounds her. Picky about what she likes. I like that.

Anyway, as soon as I heard she was having a baby and doing up an awesome nursery, I knew she was the one to have the lampshade mobile.


These pictures are obviously not of the shade as a mobile, and I didn't get a photo of the little birds hanging down. But rest assured, they're there, and they're the cutest part of the whole thing! Maybe once it arrives, my friend will be able to take a picture for us to share. That is, if she has time for pictures with a brand new baby to take care of...
Monday, June 6, 2011
Birthday Cake for a Man Who likes Zombies
What do you make?
ZOMBIE CUPCAKES!

He had originally been telling me about how he wanted something choco-rrific, but I thought that the gory mouths would not show up nearly so well on a chocolate cupcake. Then he told me I was being racist, because black people can be zombies too.
HOWEVER, the cupcakes are delicious - lemon with raspberry jam - and Dave thought they were awesome.
Sunday, June 5, 2011
glimpse
The months of May and June for most people are very busy, and it's no different for us. Dave usually works a ton, and since it's nice out, I make it a priority to take Charlie out and about to play every day. Also, I've been busy on my own volunteering at a school as well as a new business venture. To top it all off, June is filled with special celebratory events. Dave's birthday the first week, Charlie's the second, and Father's Day following that. And I like to throw in a bunch of family visits to make things exciting.
This is all a long winded way of saying we've been busy. And I haven't done much on the blog. Also, I have to stick this in the mail before I can show you all the rest, but it's a bit unwieldy to mail, which is why I procrastinate that particular task. Hopefully there's no mail strike and this arrives before a certain other special package does! Until then, you get a sneak peek:

Wednesday, June 1, 2011
Made It (sort of): Wool Dryer Ball
I cannot BELIEVE I'm writing this now, as I have a ton of stuff to do tomorrow and should really go to bed, but I've been totally neglecting the blog, and and and and AND.
Several months ago I was given the suggestion to make some felted wool dryer balls. I've never been one for fancy washing routine, and since I haven't ever used something like dryer sheets, I figured a dryer ball would be just as unnecessary. Who cares about static? However, I have since learned that dryer balls do not just reduce static in your laundry, they bounce around in there with your clothes and loosen everything up, helping to shorten the time needed to dry your clothes.
SO. I decided to try to make one of my own. I know that wool yarn can be expensive in stores - heck, even a nice poly blend can be expensive. I sure as shootin' wasn't going to go to a fancy yarn store to get my supplies for this project. So I combed the thrift shops to the best of my ability. The funny thing about yarn though, is that people often call any kind of yarn "wool." Even if it's polyester. And since thrift store yarn is often wrapped and you can't feel it, it's hard to tell just exactly what it's made of. However, I did remember that Dave's Christmas present was made of awfully scratchy cream coloured yarn - most likely wool - and I had quite a bit left over.
So I followed the instructions (basically just wind your wool into a tight ball about 1.5 " then wash inside a sock, then add more to be about 3 " in diameter, wash in a sock again until it's felted).
I generally don't wash in hot water and dry in the dryer, especially as the weather is getting nicer for outdoor drying, so I may have cut the last couple steps short. When I washed my diapers this afternoon (a grey and rainy day) I rejoiced at the chance to use my wonderful new dryer ball! But this is what came out of the washing machine:

I believe I uttered the words "laundry disaster."
Lesson learned. Follow the instructions until the project is finished. Luckily, this was only the outer layer, so I may still be able to salvage my dryer ball .
Monday, May 9, 2011
PERSONALIZED Notepads!
So remember these guys? I wrote something about how you could dress it up or down however you like. At the time, I couldn't really think of how a person might make it more interesting, short of using fancy scrapbook paper or something, but that takes a bit of the awesomeness out of the project, since you'd essentially be using new paper, rather than recycling or using up otherwise unusable paper.
HOWEVER, I was trying to make some mother's day cards for our various moms around here, when I had a major brainwave.
I printed out a few pics on my temperamental second-hand printer, and they were all pretty sub-par quality prints. I wanted 3 copies of each, so when I printed them out, there were 3 pics down the left side of each page with about 6 inches of white space to the right. Since so many of the pics were not really worthy of being put in a special mother's day card, I didn't know what to do with them all. I think I had 5 pages in all.

O ho!
All I did was cut the pages up between each picture, piled them all together, and sewed. Voila! A nice little writing pad for grandma with a cheeky boy on each page... I wish I had come up with this before I sent the cards to the faraway grannies! (I also wish that my printer was not so temperamental, or I would whip up a couple more and send them out!!)
Wednesday, May 4, 2011
Week 18: Wheat Bag Rejuvenation
In my opinion, the best reason (and for a while it was the only reason) to have a microwave is to heat up a lovely wheat bag. It's the beginning of May and I still use one (or two, or three) every night. I love having a toasty warm bag of wheaty goodness at my toes as I drift off to slumber. For a few years we didn't have a microwave, and I lamented the loss of my wheat bag every night. Heating pad, hot water bottle... nothing else quite comes close.
With all that use, my wheat bags inevitably break down after a while. I generally ask my MIL for a new one every Christmas, but even though I have 2 lovely new bags, I feel bad for the 2 sitting in my closet weeping little wheat tears. Instead of chucking this guy out, or letting him languish, I decided to give him a little sprucing up!


2) Inside out, sew sides, leaving about a 4" opening to turn inside out. I just left one whole short side.

3) Be sure to use small stitches and go over it twice just for security's sake. You don't want wheat escaping all over the place when you use this bad boy. I also serged to be safe.


4) Turn right side out and transplant wheat.

5) *optional step* Sew evenly spaced compartments so the wheat doesn't pool on one side of your bag. (I only do this with long skinny ones, not squarish ones.) It's best to do this as you fill it so you avoid sewing over wheat kernels.

6) Sew up the open side. Twice.

With all that use, my wheat bags inevitably break down after a while. I generally ask my MIL for a new one every Christmas, but even though I have 2 lovely new bags, I feel bad for the 2 sitting in my closet weeping little wheat tears. Instead of chucking this guy out, or letting him languish, I decided to give him a little sprucing up!

This one's totally simple. Take the wheat out of the ripped bag, make a new bag, and fill it with the old wheat. I used the bottom of a vintage pillowcase I got at the thrift store, since I was feeling lazy and didn't want to sew too much!
So here are the steps:
1) Cut fabric to your desired size. I went slightly longer and skinnier for the new version.

2) Inside out, sew sides, leaving about a 4" opening to turn inside out. I just left one whole short side.

3) Be sure to use small stitches and go over it twice just for security's sake. You don't want wheat escaping all over the place when you use this bad boy. I also serged to be safe.


4) Turn right side out and transplant wheat.

5) *optional step* Sew evenly spaced compartments so the wheat doesn't pool on one side of your bag. (I only do this with long skinny ones, not squarish ones.) It's best to do this as you fill it so you avoid sewing over wheat kernels.

6) Sew up the open side. Twice.
Sunday, May 1, 2011
[Where I give you advice like I know what I'm talking about]
Seven small things that are easy to do and easy on your wallet.
1) (for those who menstruate) Use a menstrual cup. No garbage, no plastic waste, no chemically treated cotton inside of you, nothing to remember to buy/have around each month except one discreet little cup! This of course doesn't work for everyone, but for some people it can be a FANTASTIC solution. It's a one time cost, but lasts for something like 10 years.

2) Make your own salad dressing. Some kind of oil, some kind of vinegar, some kind of sweetening, mustard. Anything on top of that is icing on the cake! Or spice in the dressing, as it were...
3) Use vinegar for cleaning and disinfecting.
4) Water it down!
5) If you eat meat, use less. I'm not talking full on vegetarianism here (though that's cool if you want to), just cut it back a bit. Say, halve the amount of meat you add into a recipe and double the veg. Or take days off from meat.
6) Stop eating junk food. Or cut it down. Junk food is expensive and wasteful and never tastes as good as you want it to and makes you feel a bit icky afterward (or should I say, ME). Of course, nothing beats a good burger, but at least find a GOOD burger. Something that will be worth it to you.
7) Switch paper for cloth. Bags, kleenex, towels, wipes, heck, some people even do it with toilet paper! (A non-threatening way to do this is to just use cloth for #1...)
What other kinds of things do you do to save around the house?
Saturday, April 30, 2011
Week 17: Easy Peasy Wall Hangings
(April 28, 2011)

This here's a project I've been sitting on for quite some time, but just never had the oomph to do. Or something. I'm not exactly sure why I never did it because it is dead easy and I had all the materials, but there you are...
It's a very easy no-sew fabric project, it adds a nice touch to a bare wall, and is a temporary decorative piece for renters like us! Also, I love the fact that you can use patterns that may have sentimental value to you. My mom's always using bits of scrap that came from other memorable projects. "This one was a maternity shirt, this one was your baby curtains, this was a work shirt of dad's..." Of course, I am just starting out my lifelong fabric stash, so this was all new (to me from the thrift store).
Stuff you need:

- wood embroidery hoops of varying sizes
- fabrics about an inch wider than each hoop
- glue
- tacks
- fabric scissors
What you do:
1) Cut out the fabric to be about an inch wider all around one of your hoops.
2) Separate the inner from the outer hoop.
3) Lay the fabric over the inner hoop. Push the outer hoop down over it to sandwich the fabric between, making sure that it "catches" all the way around. Pull fabric taut.
4) Secure hoop by tightening the little screws.

5) Glue down excess fabric at the back. I just used a little bit of glue stick to gently hold it down to the back of the wood, in the hopes that if I ever choose to change the fabric or even *gasp* embroider something, I might be able to get this fabric out.

6) Step back and admire your handiwork.

7) Arrange and hang on walls to your preference. I just used one regular thumb tack per hoop.

PS - Sorry I've been away so long. Just had a huge dry spell with no creative mojo and no motivation. I've got a few more up my sleeve, so hopefully I'll be back in the swing of things from now on!
Sunday, April 10, 2011
Green Changes for the Bod
I couldn't figure out what to title this post. To be truthful, I've been lacking in motivation for the past couple weeks in a major way, and I haven't had any really inspiring ideas for projects. All of this adds up to a bit of a fall off the blog wagon. And I was so gung ho for the first while!!
Anyway, I've been thinking of all the changes around the house that I've been doing since I started the blog and I thought I'd enumerate for you the "personal care" changes I've made in an effort to be rid of nasty chemicals and additives, as well as to save some moolah. Thanks to those friends who were able to help me with these changes and gave me great advice!
HAIR
- No 'poo. You can read about the process here. I've found that it works pretty well for me, though it seems as though my hair is developing a bit of an unruly wave that I'm not crazy about. If it was already slightly curly I don't think I'd mind, but going from definitely straight to neither-straight-nor-curly is kind of annoying
- I never really did use much in the way of styling products anyway, so this hasn't changed. Still using the straightener (darn wave!) and blow dryer at times
- Tried threading my own eyebrows to varying success. It's pretty hard. I broke down and went to a salon for this. Now I'll try to keep it up as long as possible on my own with plucking.
- Sugar wax. I love this, but it's hard to get the cooking time right. I keep overcooking mine and it turns into this great huge candy brick and doesn't work right.
DEODORANT
- I made this deodorant and am definitely satisfied!
- I started to use a Norwex cloth to clean the pits if they get a bit stinky. Then I use deodorant and I'm good!
FACE
- Also using Norwex cloth for my face (a separate one!!), washing with just plain water
- I have been moisturizing my face with either sweet almond oil or grapeseed oil. This is nice and light and won't clog pores
- Tea tree oil to disinfect, or spot treat any blemishes
- I got some 1% BHA gel from Paula's Choice on the recommendation of my favourite cosmetics advice lady. This exfoliates and smoothes the skin. I'll let you know how it works in a couple weeks!
- Mostly using the same makeup. Just a bit of concealer for spots, and powder mineral makeup for light coverage.
BODY
- Dry brushing! I've been doing this for about a month or more and have really noticed a difference in how smooth my skin feels. Apparently it also has loads of other benefits that I'm currently too lazy to look up for you.
- Natural soaps. My brother's girlfriend made a bunch of soaps as a gift for us this year, and when those run out I think we'll continue to use either Dr. Bronner's or Val's Veggie Bar. Or we might just beg her to make some more for us...
- Also using sweet almond oil to moisturize my whole bod! This feels totally luxurious. Though, I must admit, I still use regular commercial body butter to moisturize my feet at night. Sometimes the oil just doesn't cut it!
HANDS
- Oils for regular moisturizing. Olive, coconut, sweet almond.
- Lanolin for extreme moisturizing. This is pretty sticky though, so I only use it if I have time to just let it sink in for a while.
- Sugar/glycerin hand scrub. I just do this occasionally, but it's wonderful, and so easy!
- Nail buffer. This isn't something I would normally be interested in, but I've been working at this fancyish restaurant and I feel pretty self conscious about my drab hands. For a while I was occasionally painting my fingernails but A) it's not really me B) the polish is loaded with chemicals and C) it's not pretty if you can't keep it up. Oh, and D) who has the time to wait for fingernail polish to dry??? This nail buffer is fabulous. You just have to buff your nails with the rough side and then the smooth side. They get really shiny and smooth just as if they were painted with clear polish and it's quick and easy and chemical free.
TEETH
- I was brushing with a natural toothpaste that wasn't too bad, but it wasn't that good either, and it was pretty expensive. Then I tried using baking soda for a while, but that takes some getting used to. It's really salty! And sometimes I miss that minty fresh feeling of toothpaste. Who decided that minty = fresh anyway?
I might try to find some peppermint essential oil to add to the baking soda mix and see if that solves my toothpaste problem. Til then, I'm using colgate.
I hope this post was able to make up for the lag lately. I'm trying to get more jazzed about projects again. I think maybe if I go to bed earlier it'll help, which means this post is over!
Monday, March 21, 2011
Week 12: Chair Re-Upholstery
(March 20, 2011)
This is what our "computer chair" looked like 2 days ago:


Gross, right? I didn't mind so much the cheesy gingham/sunflower motif, but when it started peeling back and revealing the older incarnation of the chair, and WORSE, the old stuffing... I had to do something. Especially since Charlie has been running around with little bits of the ancient fluff and playing with it. Gives me a shudder every time I think about what exactly might be contained in that chair fluff. And I'm not a germ-afraid kind of person! I let Charlie eat food that's been on the floor for goodness sake!! (On occasion. Don't judge! I feel like it must be good for his immune system...)
I thought it might be kind of cool if I just got rid of the upholstery and just left it bare, since the wood style seat looked to be kind of nice, but the edges were very sharp and unfinished.
I had a bit of vinyl left over from another (still as yet unfinished) project, so I figured it couldn't be that hard to recover it myself. Anytime you look at re-upholstery on youtube, it looks amazingly easy. And it turns out it is! Kind of...
Here's what you need:
screwdriver
staplegun
staples
fabric to cover with (something sturdy)
something to stuff with (I used 4 layers of quilt bat, but it's probably better to use something like foam)
chair (like, duh)
First, disassemble the chair. For this particular chair, both the back piece and seat piece came off.

You might need a screwdriver assistant.

Next, take off the old covering. This was gross. There was a weird, decades old perfumey smell coming from the chair as I ripped away the layers that was making me nervous so I opened a window and advised Charlie to stay away.
Once you have a clean starting surface, cut out your filling and cover. Cut about an inch around the outside of your seat for the filling, and an inch or two more than that for the cover.

Start stapling! When you do this, to ensure even tension all the way around, do it in sort of a star pattern. Start in the middle of one side, then do the middle of the opposite side, pulling taut. Do a staple on each side and keep doing this until you get close to the corners. Then do the same kind of thing with each corner - start in the middle of the corner and work outwards. As you can see, it doesn't have to be perfect on the bottom, but you want the top to be fairly smooth.


Repeat for any upholstered parts of the chair, then reassemble!

Since the back part of the chair will be showing, I also cut out a piece of vinyl a little bigger than the back, folded over the edges, and used that to cover up the messy edges. These staples you want to make sure are tidy and evenly spaced.

One more note: It's probably a good idea to somehow mark where the screws go for the legs. I found it a bit tricky getting them into the right spots, because I can be a bit hasty when starting a new project. Other than that, easy peasy!
Wednesday, March 16, 2011
Week 11: Granola
(March 15, 2011)
Due to my growing yogurt craze, I've decided this week to make granola. Sure you can put fruit and other cereals in your yogurt, but nothing quite stands up to it as well as granola. By the bottom of the bowl, the Raisin Bran is soggy and the Special K has mysteriously disintegrated.
I found this recipe from www.soulemama.com and the little bits of granola looked so delicious, just exactly what I want in a granola: crunchy, sweet, with big chunks of delectable awesomeness. I love it when granola has big chunks! Apparently the recipe is from a book called Feeding the Whole Family: Cooking With Whole Foods by Cynthia Lair. You can go to the soulemama link for the recipe or buy the book.
For some reason, I thought making granola would be time consuming and/or expensive. Nope! Just mix the dry and wet ingredients separately, then combine all together, spread on a baking tray and bake. Turn several times throughout baking so that it all gets evenly crunchy. And it wasn't expensive either. The only possibly expensive items were things that we already had on hand: almonds, coconut oil, and brown rice syrup. I didn't want to use up all the brown rice syrup, so I supplemented half with maple syrup.
To make it even cheaper, you could substitute many of the ingredients. Peanuts instead of almonds, any other kind of oil instead of coconut, and any other liquid syrup instead of brown rice or maple. Honey would definitely work! And you can add in many other kinds of good things too. Dave's mom suggested flax and I wish I had thought of it before!
This granola is delicious. I've been giving it to Charlie as a little snack and he loves it. Yum yum crunch!
 |
| I picked up lots of seeds so I can make many more batches! Woohoo! |
I found this recipe from www.soulemama.com and the little bits of granola looked so delicious, just exactly what I want in a granola: crunchy, sweet, with big chunks of delectable awesomeness. I love it when granola has big chunks! Apparently the recipe is from a book called Feeding the Whole Family: Cooking With Whole Foods by Cynthia Lair. You can go to the soulemama link for the recipe or buy the book.
 |
| I doubled the recipe and it made a LOT. We now store it in the cookie jar (AKA the biggest jar in the kitchen) |
For some reason, I thought making granola would be time consuming and/or expensive. Nope! Just mix the dry and wet ingredients separately, then combine all together, spread on a baking tray and bake. Turn several times throughout baking so that it all gets evenly crunchy. And it wasn't expensive either. The only possibly expensive items were things that we already had on hand: almonds, coconut oil, and brown rice syrup. I didn't want to use up all the brown rice syrup, so I supplemented half with maple syrup.
To make it even cheaper, you could substitute many of the ingredients. Peanuts instead of almonds, any other kind of oil instead of coconut, and any other liquid syrup instead of brown rice or maple. Honey would definitely work! And you can add in many other kinds of good things too. Dave's mom suggested flax and I wish I had thought of it before!
This granola is delicious. I've been giving it to Charlie as a little snack and he loves it. Yum yum crunch!
Subscribe to:
Posts (Atom)