Monday, March 21, 2011

Week 12: Chair Re-Upholstery

(March 20, 2011)

This is what our "computer chair" looked like 2 days ago:


Gross, right? I didn't mind so much the cheesy gingham/sunflower motif, but when it started peeling back and revealing the older incarnation of the chair, and WORSE, the old stuffing...  I had to do something.  Especially since Charlie has been running around with little bits of the ancient fluff and playing with it.  Gives me a shudder every time I think about what exactly might be contained in that chair fluff.  And I'm not a germ-afraid kind of person!  I let Charlie eat food that's been on the floor for goodness sake!! (On occasion.  Don't judge!  I feel like it must be good for his immune system...)

I thought it might be kind of cool if I just got rid of the upholstery and just left it bare, since the wood style seat looked to be kind of nice, but the edges were very sharp and unfinished. 

I had a bit of vinyl left over from another (still as yet unfinished) project, so I figured it couldn't be that hard to recover it myself.  Anytime you look at re-upholstery on youtube, it looks amazingly easy.  And it turns out it is!  Kind of...

Here's what you need:

screwdriver
staplegun
staples
fabric to cover with (something sturdy)
something to stuff with (I used 4 layers of quilt bat, but it's probably better to use something like foam)
chair (like, duh)

First, disassemble the chair.  For this particular chair, both the back piece and seat piece came off.


You might need a screwdriver assistant.


Next, take off the old covering.  This was gross.  There was a weird, decades old perfumey smell coming from the chair as I ripped away the layers that was making me nervous so I opened a window and advised Charlie to stay away.

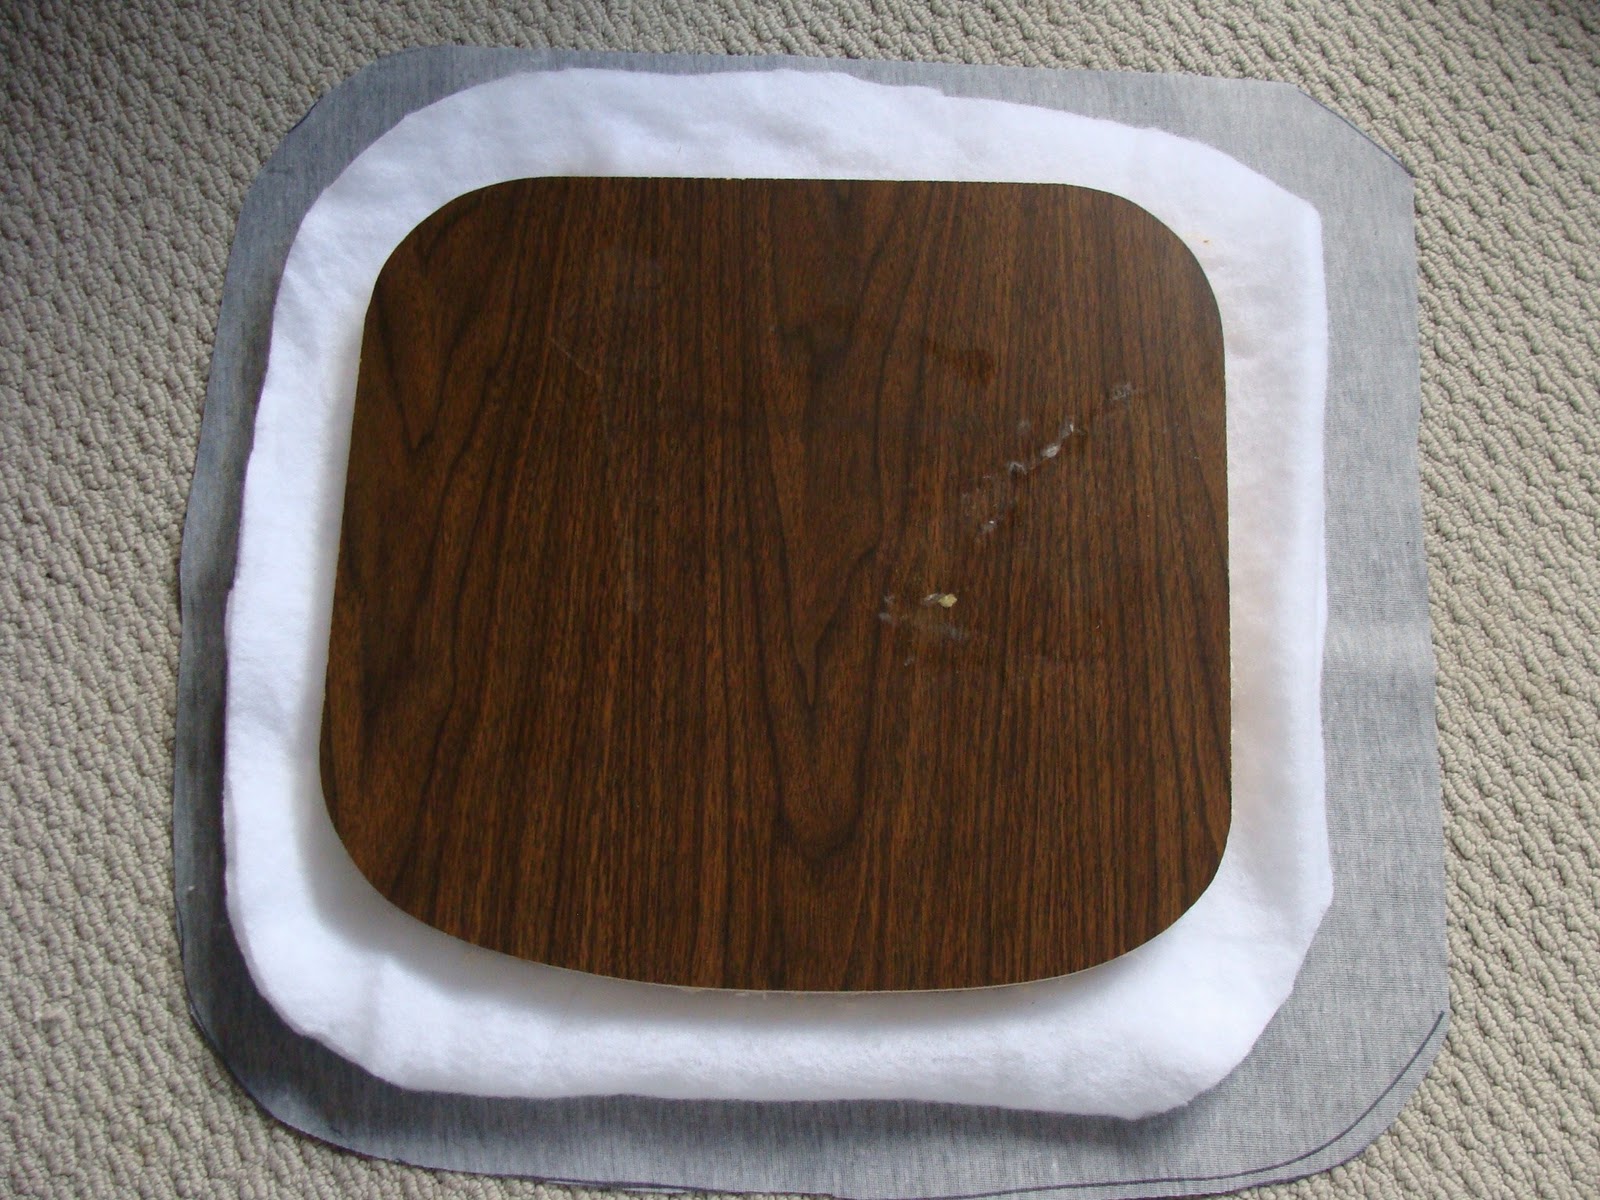
Once you have a clean starting surface, cut out your filling and cover.  Cut about an inch around the outside of your seat for the filling, and an inch or two more than that for the cover. 


Start stapling!  When you do this, to ensure even tension all the way around, do it in sort of a star pattern.  Start in the middle of one side, then do the middle of the opposite side, pulling taut.  Do a staple on each side and keep doing this until you get close to the corners.  Then do the same kind of thing with each corner - start in the middle of the corner and work outwards.  As you can see, it doesn't have to be perfect on the bottom, but you want the top to be fairly smooth.


Repeat for any upholstered parts of the chair, then reassemble!


Since the back part of the chair will be showing, I also cut out a piece of vinyl  a little bigger than the back, folded over the edges, and used that to cover up the messy edges.  These staples you want to make sure are tidy and evenly spaced. 


One more note:  It's probably a good idea to somehow mark where the screws go for the legs.  I found it a bit tricky getting them into the right spots, because I can be a bit hasty when starting a new project.  Other than that, easy peasy!

Wednesday, March 16, 2011

Week 11: Granola

(March 15, 2011)

I picked up lots of seeds so I can make many more batches!  Woohoo!
Due to my growing yogurt craze, I've decided this week to make granola.  Sure you can put fruit and other cereals in your yogurt, but nothing quite stands up to it as well as granola.  By the bottom of the bowl, the Raisin Bran is soggy and the Special K has mysteriously disintegrated.

I found this recipe from www.soulemama.com and the little bits of granola looked so delicious, just exactly what I want in a granola:  crunchy, sweet, with big chunks of delectable awesomeness.  I love it when granola has big chunks!  Apparently the recipe is from a book called Feeding the Whole Family: Cooking With Whole Foods by Cynthia Lair.  You can go to the soulemama link for the recipe or buy the book. 

I doubled the recipe and it made a LOT.  We now store it in the cookie jar (AKA the biggest jar in the kitchen)

For some reason, I thought making granola would be time consuming and/or expensive.  Nope!  Just mix the dry and wet ingredients separately, then combine all together, spread on a baking tray and bake.  Turn several times throughout baking so that it all gets evenly crunchy.  And it wasn't expensive either.  The only possibly expensive items were things that we already had on hand: almonds, coconut oil, and brown rice syrup.  I didn't want to use up all the brown rice syrup, so I supplemented half with maple syrup. 

To make it even cheaper, you could substitute many of the ingredients.  Peanuts instead of almonds, any other kind of oil instead of coconut, and any other liquid syrup instead of brown rice or maple.  Honey would definitely work! And you can add in many other kinds of good things too.  Dave's mom suggested flax and I wish I had thought of it before!

This granola is delicious.  I've been giving it to Charlie as a little snack and he loves it.  Yum yum crunch! 

Monday, March 7, 2011

Week 10: Yogurt

(March 6, 2011)


In an offhand comment, my mom recently asked me if I wanted her to bring anything for her weekend visit.  I couldn't think of anything, but she came up with the brilliant suggestion of her yogurt maker!  When I was little the only yogurt we ever had was homemade, usually with a dollop of homemade jam stirred in to make it sweet and fruity.  (Could this be where the "I could probably make that" spirit comes from?)

However, her yogurt craze ended sometime around the junior high mark for me, and I just assumed the old yogurt setup had been sold in the community garage sale or something.  Not so!  Just squirreled away in the (very full) closets of the basement! 

She even managed to find all of the little jars that go with it, so I could potentially make yogurt almost every other day - not that we'll be able to use that much yogurt...

How to make homemade  yogurt:

1 liter of milk (I used homo)
1/3 - 1/2 cup skim milk powder
some plain yogurt with live bacterial cultures (enough for a tablespoon in each jar
thermometer

1. Clean and sanitize jars.  I sanitized mine by pouring boiling water in there and leaving it for about 5 minutes.


2. Heat milk to 185 F.  Once the milk is warm, you can add the milk powder.  This helps to bump up the protein content, as well as thicken the yogurt.  I read that if you keep your milk at 185 for half an hour it will also help thicken your yogurt.  I love thick yogurt.  Make sure that the powder is all dissolved, or you'll get lumps.  (the warmth of the milk will help to dissolve it)


3. Cool milk to 110 F.  I put a bunch of cold water in the sink and put my pot in there to speed up the process.


4. While your milk is cooling, put about a tablespoon of yogurt into each container you'll be using.  Then once the milk reaches 110, pour it in while stirring to incorporate the yogurt throughout.


5. Place lids over containers and carefully set them in yogurt maker.  Be sure that this is in a space you don't mind giving up for the next 6-8 hours, because apparently the yogurt doesn't like to be disturbed.


6. Go over to grandma's for dinner, come home, watch a movie, go to bed late.  Next morning, your yogurt is made!  Put in the coldest part of your fridge - the back.

NOTES:

- If you want to use your own yogurt for the starter on the next batch, do so within a week
- It only takes 6-8 hours, and apparently the longer you leave it, the thicker and more tart it will be
- This yogurt maker is indeed "thriftee"...  my mom bought it over 20 years ago second hand, and it has been shared among the neighbours.  And it works like a hot damn!
- My batch turned out slightly lumpy.  I'm not sure why this happened, but I'm going to see if I can find a solution to this little issue.

*** You don't NEED any special equipment to make yogurt.  I've seen recipes where people use a thermos, a cooler with jugs of hot water, a heating pad, or a warming oven.  The key is that the milk is kept at a nice warm temperature and not disturbed for several hours. 

As a bonus, with all this yogurt hanging around you can use it for lots of different things!  My skin has been feeling crazy dry lately, so last night I whipped up a nice yogurt-cucumber-honey face mask.  Home spa time!

Saturday, March 5, 2011

Made It: Toddler Yoga Pants

Cruising the Salvation Army this week, I found several sections of semi-awesome to awesome fabrics in their stash there.  I think I brought home about 6 or 7 rolls of varying lengths of fabric.One of the less fantastico, but more practical selections was a very lightweight heather grey jersey knit.  Perfect for some sweet yoga pants for a tiny boy!

I had this tutorial on the backburner, just waiting for when I had some appropriate fabric, and now is the time.  They really are as easy as she says they are.  The only possibly tricky part is measuring the waist of a child who has just recently learned how to suck his tummy in and doesn't like the cold measuring tape on his bare sensitive skin!

I think these pants had a total of 5 seams to stitch.  (I had a coordinating thread in my serger so I serged the edges, but it's probably not necessary.)

1) Making sure the stretch goes side-to-side instead of up and down, use a pair of pants that currently fits to trace a rough pattern of the legs.  EXCEPT for these pants, just do a straight wide leg.  Don't taper!


Like so:


2) Measure and cut waistband.  This will be a rectangle of 10 inches tall by (waist + 1 inch) wide.  The waist measurement is the stretchy way.  For Charlie this was 18 + 1 = 19 inches.  This was the tricky measuring, because the first rectangle I cut was only 16 inches and barely fit around his waist!


3) Fold in half, right sides together, and sew the waist band on the small (10 inch) side.


4) Right sides together, sew each leg from crotch down.

5) This part is also slightly tricky.  Put one leg inside out and one leg right side out.  Slip the right side out leg inside the inside out leg, and match up the "U" shapes.  I'm sorry if these instructions are confusing and mangled.  Pin, check Samster Mommy's instructions again to see if they're clearer, then sew.


6) Waistband time!  Fold the rectangular tube so that it is only 5 inches tall, right side out, and pin to the top of the pants (which you have also turned right side out), lining up the open unfolded end of the rectangle with the top opening of the pants.  Sew!


Honestly, I thought I would be able to explain it better than that.  But it's late and I'm feeling like my brain is a bit more mushy than usual.  Here are some pics of Charlie modeling with a frog book and a cookie cutter.


Something extra awesome about these pants: You could definitely make something VERY similar for yourself or another big person if you had more fabric and were so inclined.  Easy peasy!

Cost breakdown:  $2.49 for 1m of fabric (I suppose I'm assuming you have the machine to pull this off, and thread is negligible.  You could probably hand sew it if you had to...)

Thursday, March 3, 2011

Notes

1) Since I started this blog, I have used an entire 2 kg box of baking soda. I don't recall ever finishing a box of baking soda, even a tiny one.

2) Essential oils are amazing.  Last night I wanted to have a bubble bath (no bubbles!) so instead I had a smelly bath.  I put some sweet almond oil in my palm and a couple drops each of ylang ylang and lavender, then swished it around in the bath water with some baking soda.  Definitely fell asleep in the bath.

3) I used the remainder of the sugar hand scrub from the other day on my face this evening and it feels WONDERFUL!

4) Both because of cost and because I found out some discouraging info about my go-to face lotion, Clinique's Dramatically Different, I have been searching for something I can make myself.  However, making your own skincare is pretty complicated, expensive, and usually doesn't have a very long shelf life.  I've been using sweet almond oil on my face (and the rest of me!) for a couple weeks, and it's quite lovely.  It's hard to keep my hands moisturized, but for the body and face it's really nice and doesn't clog pores. 

5) The grapefruits this time of year are delicious.

6) Did I mention my love of lists?  ;)

 7) I've got a project in the works (read: something I'm vaguely thinking of doing) but it's boringly practical.  However, I do expect it to be one of those things that helps out a lot with the household budgeting.  What do you think?  Post?  Or too boring?  Maybe I should try it out for a little while and then let you know...

8) I've been trying out different old-timey methods of curling my hair, and so far, pincurls win!  Here's a pic from our new webcam with old-timey effects to match the curls.

Wednesday, March 2, 2011

Hand Scrub Day

Last week at the checkout counter I noticed that the cashier had what looked like the most beautiful manicure ever, and looking at my own hands as I accepted her change was almost embarrassing.  It's winter, I don't drink very much water in a day, and we use our fireplace quite a bit for heat, so my hands are in quite a state right now.  Often they are so bad that no matter how much oil and lotion I use, they're still rough and chapped.  I longingly thought of getting a nice manicure, but that seems like such an indulgence especially since lately Dave hasn't been able to work in this cold weather.

I set out this morning to try a salt scrub for my hands, but I found that we only have the super coarse type of salt.  I tried it out with a couple other mamas who brought their boys over to play.  I'm not sure if it worked for them, but I was unsatisfied.  I think the salt was too coarse to do a good job exfoliating. 

Here's the recipe for the first scrub:  equal parts olive oil & salt, rub over hands for a few minutes


Thank you Sharley for your beautiful hand modelling!

My second attempt was a bit more in-depth.  I found a recipe for "nail whitening" on a site that also had a hand scrub recipe, so I figured I'd try it since I already had the ingredients. 

Here are the steps:

1) drink a big glass of water with ACV

2) soak nails in 1 c. water with 1 denture soak tablet (This is the "nail whitening".  Not quite sure why you'd want to do this, but what the heck...)


3) mix hand scrub (1 T. white sugar, 1 T. veg. glycerin, 1 drop EO - I used grapefruit) and scrub for several minutes, then leave to set for 3-4 minutes, rinse off


4) moisturize (I used sweet almond oil)

My hands feel absolutely wonderful right now.  I will freely admit that I have abnormally wrinkly hands for a person my age, but right now they are feeling downright buttery soft and youthful!

Tuesday, March 1, 2011

Laundry Powder - How we do

We just ran out of our trusty laundry powder, so this week I decided to try a different soap to go with it.  Mostly because Dr. Bronner's is so expensive.  And we usually use Val's for our bodies*, so why should we use the fancy stuff for just washing our clothes?!  On the plus side, this Val's batch of soap was really crumbly, so instead of grating in little flakes, it pretty much turned into powder right away, which I feel like must be better for the wash.


* Except for when we are using the beautiful batch of soap my brother's girlfriend made for us.  It's so nice!

Week 9: Bubble Bath Flop


(March 1, 2011)

As suggested by a friend of mine, I set out this week to make a nice bubble bath for Charlie's evening baths.  Something gentle with natural ingredients and soothing and bubbly!

I found this recipe several times over, so decided it must be a good one:

1 cup liquid castile soap
3/4 cup water
1 tsp. glycerin
6 drops essential oil


For a soothing sleepytime bath, I selected Lavender EO.  I mixed it up, and put it in a nice pump bottle and got excited about using it, but it doesn't work!! 

The only thing that happened is that it turned the bath water very milky and slightly lavender-scented.  I even added just straight soap and it didn't bubble!  Maybe I need more glycerin? 

This was a pretty disappointing project for us...  Though the bath was nicely soapy and smelly and it did the job getting a small body clean, the whole point of a bubble bath is the BUBBLES!


I'll probably continue to tinker and search for better recipes to make this work.

Pants helps to stir it up

Cost breakdown: Castile soap $5.00 + glycerin $0.30 + EO (varies depending on type of oil) = between $5.50 and $6.00 for just under 2 cups of bubble bath.  That doesn't work.

On the plus side, apparently this liquid Dr. Bronner's soap can be used for a multitude of things, so at least I can use the rest for other projects along the way.  And the "bubble" bath still smells quite nice.  Maybe it'll just be cloud-bath from now on...


Cloudy bath water!